- 04/14/2018
- 4 Min Read
- By: Eric Seeger
How to Replace a Water Pump on an E39 BMW 5-Series (6-cylinder)
It’s no secret that the E39’s Achilles Heel is its dismal cooling system. Built almost entirely out of plastic, the system doesn't age well. When its components fail, they have a well-documented history of taking head-gaskets with them when the car overheats as a result of a lack of coolant or flow. This is one area of your car where it’s better to just fix everything at once, rather than trying to replace each piece as it goes. Generally, it’s good to perform this service every 100,000 miles as preventative maintenance.
In my case, most of the car’s cooling system had been refreshed about 9 years (65,000 miles) ago, but a noisy/loose water pump bearing forced me to park the car and tackle the job immediately.
Time and Difficulty
The job is not particularly difficult, but it does involve a lot of steps. Plan a solid afternoon to do this project if it’s your first time. Take stock in all the parts that you will be removing; it will never be easier to replace things like hoses, belts, belt tensioners, fan shroud, coolant expansion tank, etc.
Special Notes
-
Allow the car’s engine to cool down before attempting this project. Hot coolant is under pressure, and it can easily send you to the hospital with burns.
-
Make sure you have the right torque wrench (see below) before attempting this job. The torque values are extremely light, and over-torquing bolts by a slight margin will risk stripping the threads in the aluminum cylinder head.
Tools
- Large drain pan, towels, and a mop
- Phillips screwdriver
- Torque wrench that registers inch-pounds
- 10 mm socket
- 13 mm socket
- 16 mm socket
- Socket wrench with 4-inch extension
- Fan clutch wrench set
Required Parts
- Water pump
- Water pump pulley
- Coolant
- Thermostat
- Upper radiator hose
- Lower radiator hose
- Auxiliary Fan Switch
- Coolant bleeder screws (x2)
Optional Parts
- Coolant expansion tank (coolant reservoir)
- Fan Shroud
- A/C Belt
- Water Pump/Alternator Belt
- Fan clutch
Let’s get started
- Raise the front of the car and place it on jack-stands.
- Remove the radiator cap.
- Remove the splashguard (belly pan) by undoing the nine fasteners, using a Phillips head screwdriver.
If your car is equipped with a blue drain plug on the driver side bottom of the radiator, turn the tab on the plug 90°. Then use a pair of pliers and wiggle the drain plug down and out of the radiator. Have a drain pan ready, because this will immediately release much of the car’s coolant.
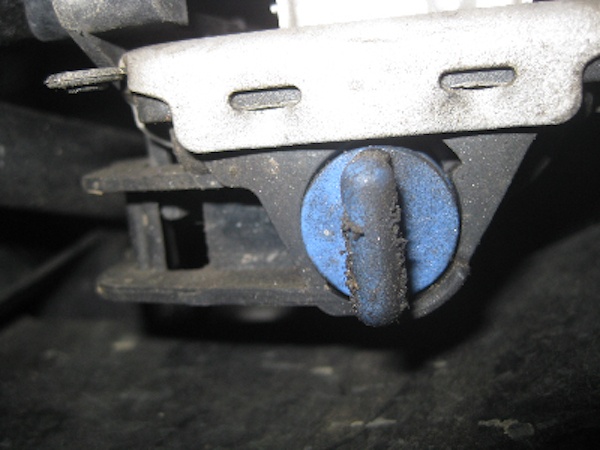
- There are two coolant hoses that are held by clips the bottom of the radiator fan shroud. Free those from the clips, because later on you will need to remove the fan shroud.
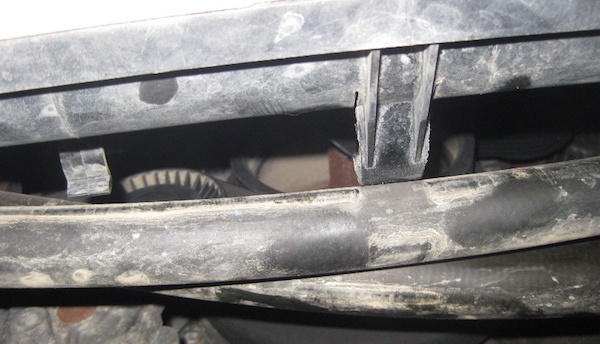
- Remove the retainers that attach the fan shroud to the radiator.
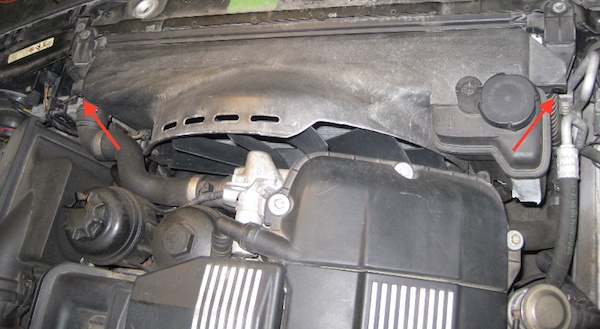
- Disconnect the wire from the auxiliary coolant pump (located on the lower, rearward driver’s side of the radiator fan shroud). Slide the pump out of its mount.
- Disconnect to this wire on the driver side of the fan shroud.
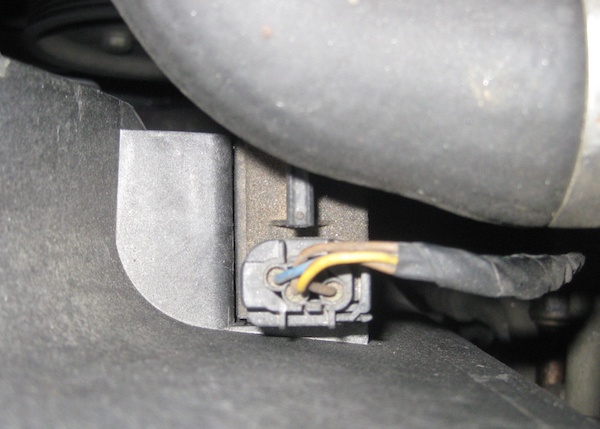
- Release the expansion tank from the fan shroud by lifting it slightly, and move it out of the way.
- If you need help with this step, you can refer to this blog post detailing the expansion tank removal process.
- Use a fan clutch tool and thin 32mm wrench to loosen the fan from the water pump.
- Once the fan bolt is loose, you can spin the fan clockwise off of the bolt by hand.
- Lift the fan and the fan shroud out of the car at the same time. Do this slowly and make sure that all of your connectors are out of the way and that the shroud is not hung on any hoses.
- Use a 16 mm socket or wrench to release the drive belt tensioners, and remove both drive belts. (Inspect the pulleys for noisy or loose bearings. Replace them if necessary.)
- Unplug the coolant sensor from the thermostat.
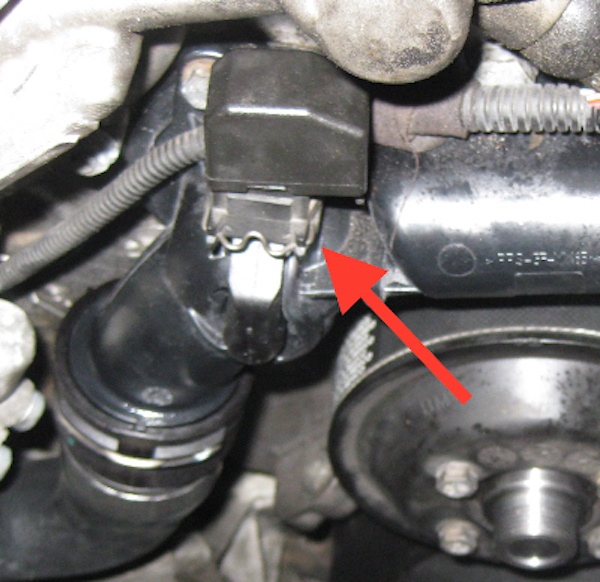
- Unplug the coolant sensor from the lower radiator hose.
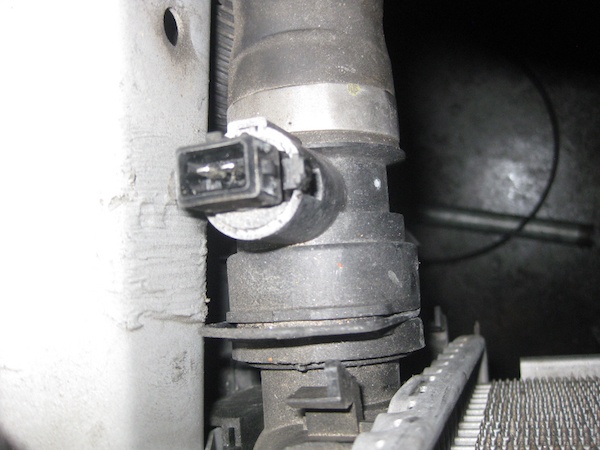
Removing the thermostat housing
- Remove the lower radiator hose.
- Remove the four bolts that hold the thermostat in place. Three of the bolts are 10mm, and one bolt is 13mm. (Tip: keep two of the 10 mm bolts handy. You will need them to remove the water pump.)
- Have a drain pan ready when you remove the thermostat housing.
Removing the water pump
- Remove the 10 mm bolts that attach the pulley to the water pump.
- Insert the 10 mm bolts from the thermostat into the threaded holes on the sides of the water pump. Turn each bolt two rotations at a time, alternating from one to another. These bolts will help slowly drive the water pump off of the engine.
- Have a drainpan ready when you remove the old water pump.
Reassembly
- Clean any dirt/debris from the mating surfaces where the water pump or thermostat will be mounted.
- The new water pump may be difficult to press into place. Hold the water pump in position while starting the nuts by hand. Using only a few turns at a time, gradually use a crisscross pattern on the nuts to draw the water pump into place.
- Using a torque wrench, tighten the water pump bolts in a crisscross pattern to 89-inch pounds of torque.
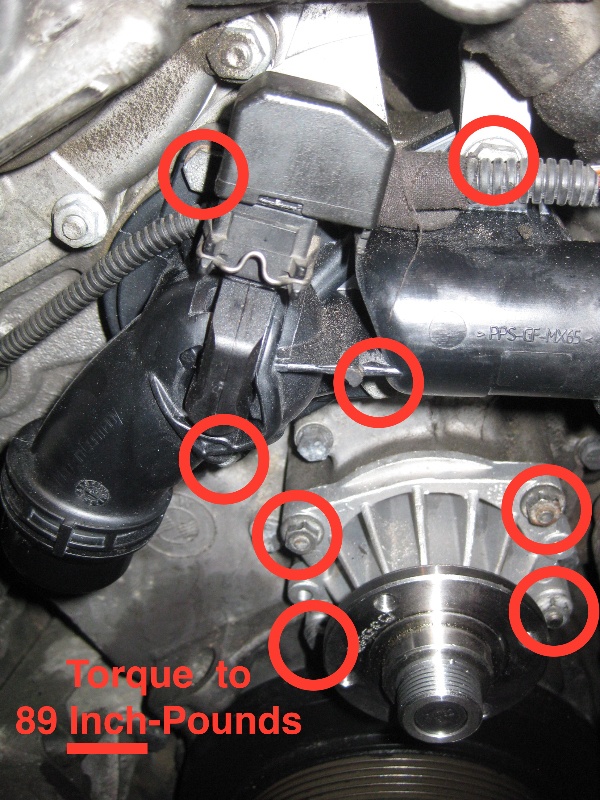
- Install the thermostat housing. Using a crisscross pattern, tighten the bolts to 89-inch pounds of torque.
- Install a new water pump pulley. Using a crisscross pattern, tighten the bolts to 89 inch pounds of torque.
- Install coolant sensor on lower radiator hose. If you plan to reuse your old coolant temperature sensor, install a new O-ring.
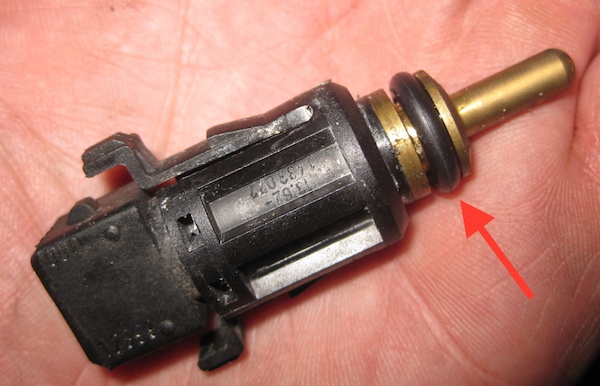
- Install lower radiator hose.
- Reconnect wire to coolant temperature sensor on lower radiator hose.
- Install air-conditioning belt. Install alternator, water pump and power steering pump belt.
- Install upper radiator hose.
- Slide the fan shroud and the fan into place at the same time.
- Install the fan back onto the water pump pulley. The bolt for the fan is reverse threaded, so spin the fan counterclockwise to tighten it. Snug the fan’s bolts with a 32 mm wrench.
- Reconnect the plug on the upper right-hand side of the radiator?
- Install the expansion tank vent hose to the upper driver side corner of the radiator.
- Make sure that the expansion tank is seated securely. Reinstall the expansion tank seal (around the bleeder screw) that connects the expansion tank to the fan shroud.
- Reinstall the plastic retainers that connect the fan shroud to the radiator.
- Reinstall the rubber strip that sits in front of the fan shroud.
- Install the radiator drain plug.
- Put the coolant hoses from the expansion tank back into their holders at the bottom of the shroud. Seat the electrical coolant pump back into its place on the fan shroud.
- Reconnect the electrical plug for the electrical coolant pump.
Filling and Bleeding the System
- Remove the radiator cap and the bleeder screws on the expansion tank and the upper radiator hose (near the thermostat).
- Turn the ignition key to the On position, but do not start the engine. Set the heater to full heat, and the fan to low. You should be able to hear the electric coolant pump running.
- Slowly pour a 50-50 mix of fresh coolant and water into the expansion tank.
- When coolant starts to pour out of the bleeder located on the upper radiator hose, replace the bleeder screw. Make it snug, but do not over tighten as it may crack in the plastic screw.

- Start the engine and let it idle. Pour more coolant/water mix into the system until it comes out of the bleeder next to the radiator cap. Keep the expansion tank filled to the proper height with coolant as the engine comes up to temperature. Keep an eye on the temperature gauge. Make sure it does not go much past the middle. Small bubbles may appear at the expansion tank as the system purges itself of air.
- After idling the engine at operating temperature for a few minutes, replace the expansion tank bleeder and radiator cap. Take the car for a short drive with the heater on. Monitor the engine temperature.
Lastly, allow the car to cool down. Once it's completely cool, remove the expansion tank cap and refill if needed. You may need to repeat the cycle (fill, run, cool, fill) a few times to ensure all air is out of the system.
While this process is definitely one of the more involved services for this model, completing it now will save you the headache of overheating for up to another 100,000 miles, should everything else run smooth. Happy wrenching!


