- 05/20/2022
- 4 Min Read
- By: Alex Fiehl
How To Replace A BMW E39 Coolant Expansion Tank (Six-Cylinder)
Every major German manufacturer began to use plastic coolant expansion tanks in their vehicles around the mid-nineties. BMW is no exception, and its plastic expansion tanks have played a significant role in their seemingly constant cooling issues. The plastic designs are cheap, lightweight, and easy to produce, so it's a no-brainer why manufacturers use them. However, their construction is also their downfall. Plastics and heat aren't a perfect combination, and the heat in an engine bay will cause a plastic coolant expansion tank to become brittle over several years. Once brittle enough, the coolant tank will break and leave you stranded on the road. Instead, follow along with this DIY to replace your aging tank with a fresh one.
Before you embark on this job, take stock of the plastic under your BMW’s hood. E39s aren’t exactly spring chickens anymore, and their engine bay plastics are likely feeling those effects. Does the fan shroud look chalky and brittle? Are the surrounding hoses riddled with cracks and splits? The chances are that more parts will need replacing while you’re in there.
BMW models and years applicable:
- 2001-2003 BMW 525i
- 1998-2000 BMW 528i
- 2001-2003 BMW 530i
How long will it take to replace the coolant expansion tank on an E39 BMW 528i?
Replacing your coolant tank is a relatively simple job in theory. It requires removing a few clips, some hoses, and draining some coolant. The job does become a little more tricky when the parts you’re dealing with are old and prone to breaking. Set aside about an hour for the entire process to give yourself enough time to work carefully.
How much will it cost to replace the coolant expansion tank on an E39 BMW 528i?
Replacing the coolant expansion tank on your M52-powered BMW E39 will cost you between $150 and $200, depending on who makes the parts. Genuine, OE, OEM, and Aftermarket parts are available for this job, so it’s up to you to decide which you’d like to use. Additionally, we offer two pre-built kits that are targeted toward an overhaul of the cooling system components. They’ll run you about $300 and cover a handful of the other cooling system components known to break.
Parts required to replace the coolant expansion tank on an E39 BMW 528i:
- Coolant Expansion Tank
- Coolant Level Sensor
- Expansion Tank Cap
- Bleeder Screw
- Tank Seal
- Coolant
- Fan Shroud Retainers (x2)
Tools required to replace the coolant expansion tank on an E39 BMW 528i:
Steps required to replace the coolant expansion tank on an E39 BMW 528i:
Step 1: Access the bottom of the car
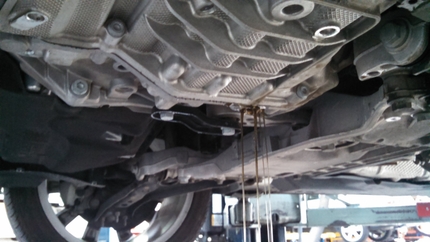
A plastic splash guard fitted beneath the engine keeps the bay clean but prevents anyone from accessing the engine bay from underneath. Start by raising the front of the car with a jack and then setting it down onto jack stands. The car should be high enough that you can remove the splash guard but still have access to the engine bay. Then, use the Phillips head screwdriver to remove the nine fasteners that secure the splash guard to the chassis.
Be careful as you remove the splash guard. It has likely trapped debris above it that will come falling down as you remove it. Once removed, set it aside and place the drain pan beneath the expansion tank on the passenger side of the radiator.
Step 2: Access the expansion tank
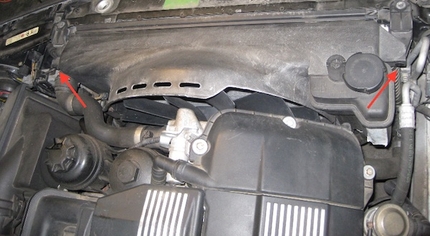
The expansion tank is tucked against the radiator and under the fan shroud. You need access to the top of the tank, so remove the fastener on either side of the fan shroud to give yourself wiggle room. The fasteners are plastic rivets and should need a little persuasion from a flathead screwdriver.
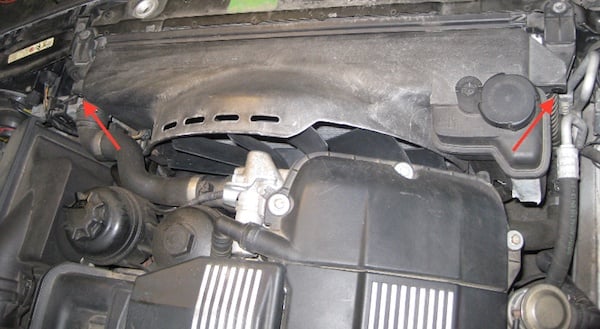
Next, remove the bleeder screw next and the expansion tank cap. Use a Phillips head screwdriver on the screw; you can remove the cap by hand.

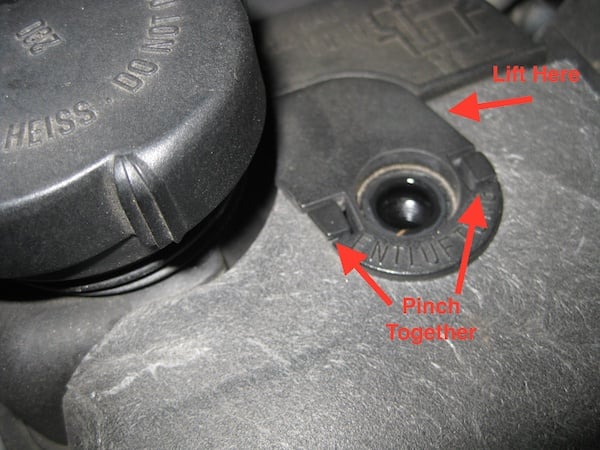
The plastic piece surrounding the bleed screw threads is the “tank seal” used to secure the fan shroud against the tank. Squeeze the two tabs in on the seal and lift it out. Use a flathead screwdriver to pry up on the seal if you need.
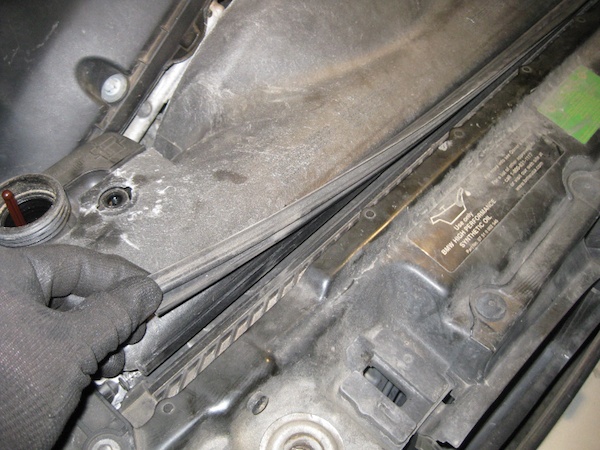
Lastly, remove the rubber strip between the radiator shroud. With that out of the way, you’ll be able to raise the shroud enough to get to the necessary fittings for removal.
Step 3: Remove the expansion tank
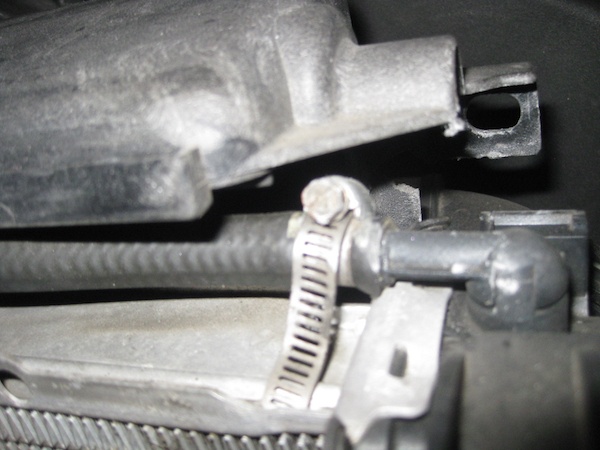
Start by lifting the fan shroud as much as possible to access the tank's vent hose. Then remove the clamp securing the line to the tank. The original BMW clamp is an Oetiker clamp, so you’ll need to use a pair of cutters to break the clamp. Any other kind of clamp isn’t OE and is specific to you, so you’ll need to remove it with whatever it requires. Once you have the clamp off, remove the hose from the tank.
At this point, you should be able to lift and wiggle the expansion tank up off the radiator but not out of the car. There are two more coolant hoses at the bottom of the tank, along with the coolant level sensor. Disconnect the coolant level sensor and then remove it from the tank. Coolant will flow out of the sensor port and hopefully into the drain pan.
Remove the coolant hoses after the coolant has stopped draining from the tank. Pull out the metal locks from around the hoses and remove them from the tank. The lines will have coolant in them, so do your best to get the fluid into the drain pan.
Step 4: Installing the new expansion tank
Note how the expansion tank will be seated on the lower fan shroud mounts when you reinstall it.
Grab the new tank and install the coolant level sensor before tossing it into the engine bay. Then, reconnect the two lower coolant hoses and lock them back into position. After that, fit the new expansion tank into position on the radiator.
Ensure you have the tank seated in position before moving on. Then, refit the vent line at the top of the tank. An oetiker clamp is the OE way to secure the line to the tank, but a basic worm gear clamp will do the job. After that, lower the shroud over the tank and fit the new tank seal. Use the new plastic rivets to secure the fan shroud to the radiator and thread in the bleeder screw.
Step 5: Refill the coolant
With the tank installed, it’s time to refill it with fresh coolant. Be aware of the kind of coolant you have before pouring it into the tank; some coolant comes pre-mixed, while others are pure concentrate. You have to mix the concentrate 50/50 with water before you can use it.
Fill the tank with coolant and start the car. Allow the engine to reach operating temperature to release any air bubbles in the cooling system, and then top it off with any more coolant it may need. Have the bleeder screw cracked open during this point to let the air escape. Refit the tank cap and bleeder screw once the process is complete.
Step 6: Refit the splash guard
Shut the hood and head back under the car. If you haven't done so already, drag the drain pan out from under the radiator and refit the splash guard. Push it up into position and thread in the nine securing fasteners. Thread them in by hand to prevent cross-threading before tightening with a Phillips head screwdriver.
Take the car down off the jack stands and go for a spin around the block. Check the coolant level when you return and top it off as necessary.
So that's how you replace the coolant expansion tank in your M52-equipped BMW E39 525i, 528i, and 530i. If you have any questions comments, or concerns, please leave them in the comments section below. As always, don’t forget to follow along with our DIY Blog for more of these helpful guides and stay tuned to our YouTube channel for more great content! Let us know in the comments below if you have any questions or concerns. Happy wrenching!


